Imagine a reader opens your post on the train, taps “play,” and hears 東京都 read as “Higashi-Kyoto.” Awkward, right?
That’s the risk with Japanese text-to-speech.
Adding a listen button to WordPress is easy. Getting it to sound natural in Japanese is the hard part. One kanji can have several readings. Names, dates, and counters trip up weak voices. And if a visitor’s phone has no Japanese voice installed, your “listen” button may say nothing at all.
So how do you pick a tool that actually reads Japanese well?
This guide compares the plugins that matter for Japanese sites, shows you how to set one up step by step, and covers something most guides skip: how to fix misread kanji before your readers notice.
Quick Answer: To add Japanese text-to-speech in WordPress, install a TTS plugin like AtlasVoice that supports Japanese voices. Then test it with tricky kanji, names, and dates before going live.
What is Japanese Text-to-Speech?
Japanese text-to-speech (TTS) is a technology that turns written Japanese into spoken audio. You give it text, and it reads the words aloud in a Japanese voice.
On a WordPress site, this usually shows up as a small play button at the top of a post. A visitor taps it, and the article starts reading itself.
Simple idea. But what happens behind that button?
How It Works
A Japanese TTS engine does three jobs in a split second:
- Reads the text. It splits the sentence into words, which is harder than it sounds because Japanese doesn’t use spaces.
- Picks the right pronunciation. It decides how each kanji should be read in context. For example, 今日 is usually “kyou,” not “konnichi.”
- Speaks it. It adds rhythm, pauses, and pitch, then plays the audio.
Why Add a Japanese Audio Option to Your Site?
Not everyone wants to read a long article on a small screen. Some readers are busy, some are learning Japanese, and some simply prefer to listen.
So is a play button really worth it? Here’s what it can do for your site.
- Readers can listen on the go: Many people browse during a commute or while cooking. Audio lets them enjoy your post even when their eyes are busy.
- It helps Japanese learners: Learners can hear how words actually sound, including tricky kanji. With a slower speed, your post becomes a mini listening lesson.
- It makes content more accessible: Audio helps readers with low vision, dyslexia, or reading fatigue. Just remember it’s an extra, not a replacement for screen-reader-friendly design.
- Visitors may stay longer: People who press play often stick around for more of the article, which means fewer quick exits.
- It sets your site apart: Most Japanese blogs still don’t offer audio, so a natural-sounding voice makes yours feel more polished.
- What about SEO? Audio alone won’t boost your rankings. But if it keeps readers engaged, it can support your site’s performance over time.
Why Japanese Is Tricky for Text-to-Speech?
English TTS has come a long way. So why do some Japanese voices still sound confused? It mostly comes down to how the language is written.
A single Japanese sentence can mix kanji, hiragana, and katakana, with no spaces between words. Before a voice can speak, it has to figure out where each word starts and ends.
The bigger challenge is that one kanji can have several readings. 人 can be “hito,” “jin,” or “nin,” depending on the word. A good voice reads the context and picks correctly. A weak one simply guesses.
Pitch and numbers add to the trouble. 橋 (bridge) and 箸 (chopsticks) are both “hashi,” but they sound different in pitch. And 2日 is read as “futsuka,” not “ni-nichi,” which catches many voices off guard.
Still, modern AI voices handle most everyday Japanese well. Just test with real names, dates, and rare kanji from your site before you go live.
Requirements Before Adding Japanese Text-to-Speech to WordPress
Before you jump in, let’s make sure you have everything ready. The good news? The list is short, and you probably have most of it already.
Here’s what you’ll need:
- Admin access to your WordPress site: You’ll be installing a plugin and changing a few settings, so you need to log in with an Administrator account. Editor or Author roles won’t have permission to do this.
- The AtlasVoice plugin: This is the tool we’ll use throughout this guide. On WordPress.org, you’ll find AtlasVoice free version listed. The free version works right after activation, so you can test Japanese audio within minutes.
- A browser with Japanese voices: The free version of AtlasVoice uses the voices built into your visitor’s browser. Chrome, Edge, Safari, and Firefox can all read Japanese, but the number and quality of voices change from one device to another. Edge usually offers the most natural-sounding options, while Firefox depends on the voices installed on the computer itself.
- Your site language set to Japanese (recommended): Go to Settings > General and check that the Site Language is set to 日本語. This helps browsers pick a Japanese voice instead of trying to read your text with an English one.
- AtlasVoice Pro (optional, for AI voices): Want natural Japanese audio that sounds the same on every device? AtlasVoice Pro adds AI voices and downloadable MP3 files. You can use AtlasVoice’s own AI engine or connect an outside provider.
- An API key or JSON file (only for outside providers): If you choose a provider like Google Cloud, you’ll need its service account JSON file, which you upload inside AtlasVoice under Integration > Google Cloud TTS. Skip this step if you’re using the free version or AtlasVoice’s built-in AI.
5 Steps to Add Japanese Text-to-Speech in WordPress
Ready to make your posts speak Japanese? The whole setup takes about 10 minutes, and you don’t need to touch a single line of code.
Let’s walk through it, step by step.
Step 1: Install the AtlasVoice Pro Plugin
First, get the plugin up and running on your site.
- Purchase and download AtlasVoice Pro from the official website.
- In your WordPress dashboard, go to Plugins > Add New > Upload Plugin.
- Choose the downloaded ZIP file and click Install Now.
- Click Activate once the installation finishes.
- Enter your license key when prompted to unlock the Pro features.
The Pro version is needed here because it includes the AI Japanese voices and integrations used in this setup. If you get stuck, follow the AtlasVoice Pro installation guide for detailed help.
Step 2: Choose the AtlasVoice TTS Pro Player
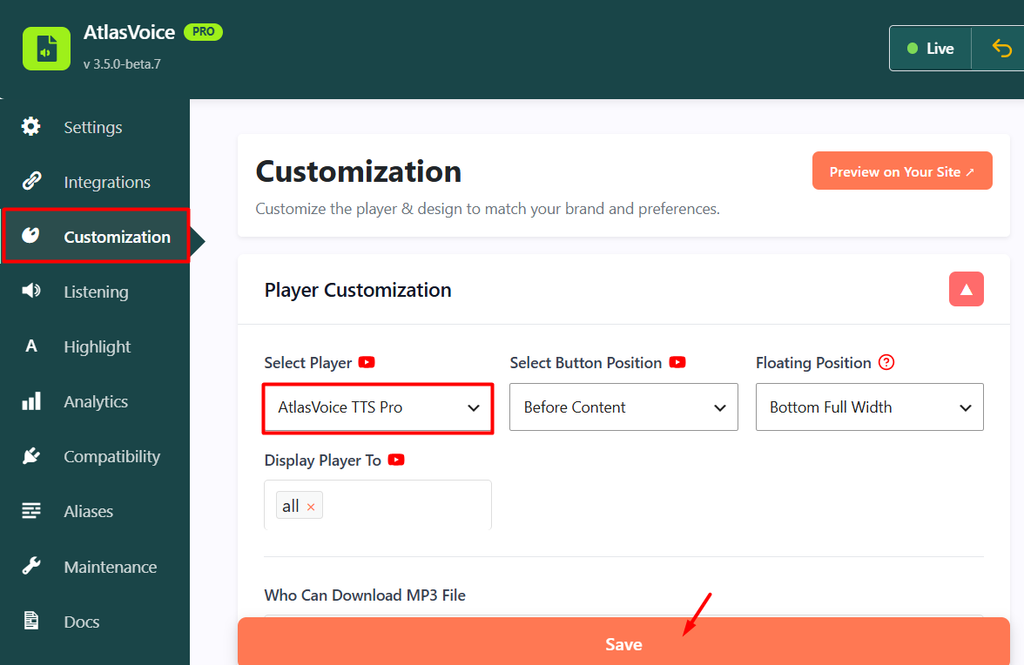
Next, tell AtlasVoice which player to use for your audio.
- Open the AtlasVoice menu and go to the Customization tab.
- Find the Select Player option.
- Choose AtlasVoice TTS Pro as your TTS player.
- Adjust the player placement, colors, button style, and other settings to match your website’s design.
- Click Save Changes.
Tip: Keep the player simple and easy to spot. A short label like Listen to this article makes the button feel natural for Japanese readers.
Step 3: Select Your Japanese Voice
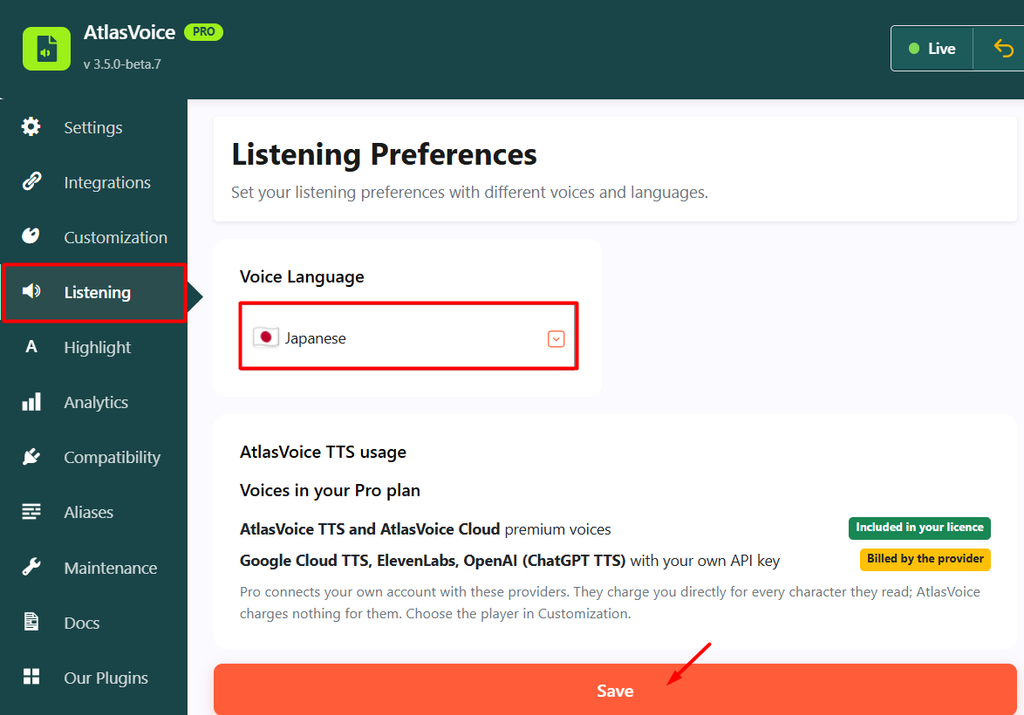
This is the most important step. The voice you pick shapes how natural your audio feels to native listeners.
- Go to the Listening tab.
- Open the Voice Language dropdown.
- Choose Japanese (Japan).
- Pick a voice from the available options. Try a few, since each one has its own tone, pitch, and speed.
- Click Save Changes.
Unlike Spanish or English, Japanese doesn’t have regional variants to choose from here. So focus on matching the voice to your content instead.
A calm, clear voice works well for news, business, and how-to posts. A warmer, softer voice suits lifestyle, travel, and personal blogs. Running a learning site? Try lowering the speed slightly so learners can follow along.
Not sure which one fits? You can listen to sample voices on AtlasVoice’s Demo Portal before deciding.
Step 4: Turn On the Player Automatically
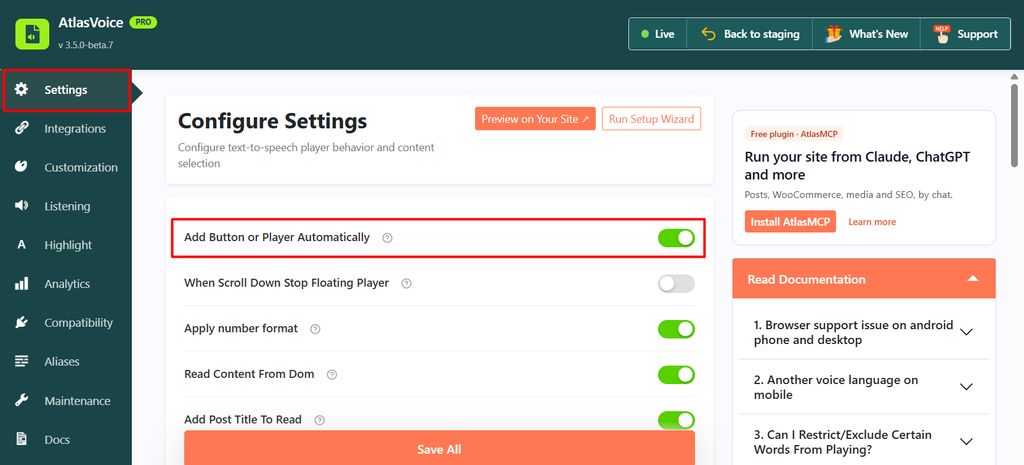
Now let’s make the player show up on your posts without adding it one by one.
- Go to the Settings tab.
- Find the Add Button or Player Automatically option.
- Make sure it’s enabled.
- Choose the content types where you want the player to appear, such as posts, pages, or WooCommerce products.
- Click Save Changes.
Only want audio on a few posts? You can turn off automatic placement and use the [ atlasvoice ] shortcode or the Gutenberg block instead. This is handy for bilingual sites where only your Japanese posts need a Japanese voice.
Step 5: Test How Your Japanese Audio Sounds
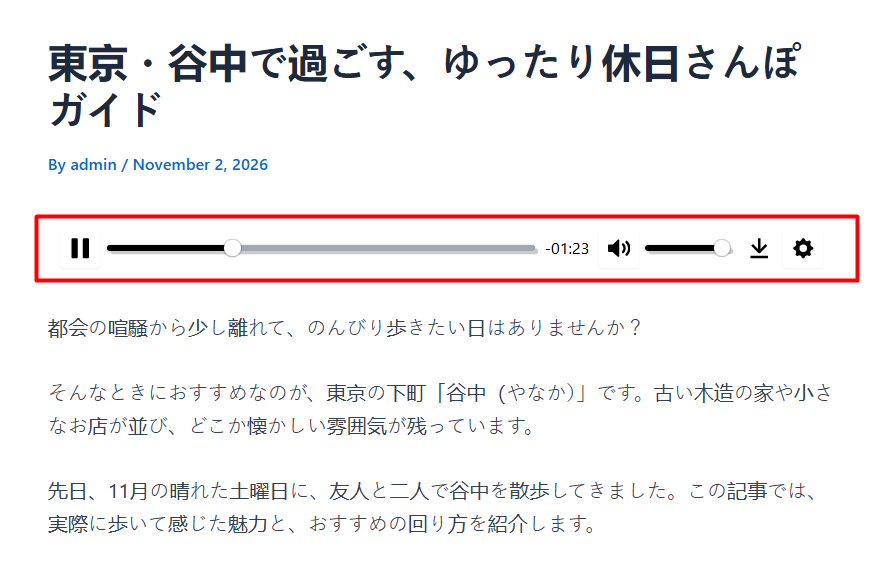
Don’t skip this one. Japanese is where small reading mistakes stand out the most.
- Open any Japanese post where the AtlasVoice player is enabled.
- Click the Play button.
- Listen closely for:
- Correct kanji readings, such as 今日 read as “kyou”
- Names of people and places, which are easy to misread
- Dates and counters, like 2日 (“futsuka”) and 1人 (“hitori”)
- English words or brand names mixed into Japanese text
- Natural pauses at 、and 。
- Test on both your phone and your computer.
If a word keeps coming out wrong, try a different voice first. If the problem stays, write that word in hiragana in your post. It’s a simple fix that works with almost any voice.
Even better, ask a native Japanese speaker to listen for one minute. They’ll catch things you might miss.
Once you’re happy with the result, 完成です! Your WordPress site now speaks Japanese.
How to Add Japanese Text-to-Speech from 3rd Party Integrations?
Want more Japanese voices to choose from? AtlasVoice Pro lets you go beyond its built-in AI engine and connect popular voice services you may already know.
You can add Japanese voices from Google Cloud, ElevenLabs, and ChatGPT (OpenAI) right inside your WordPress dashboard. Each one has its own style.
The best part? The setup is the same for all three. Just keep your API key ready and follow these steps:
- Go to Integrations, select your voice service, enter your API key, and click Save Changes.
- Go to the Customization tab, select the player that matches your integration, and click Save Changes.
- Go to the Listening tab, select Japanese, and click Save Changes.
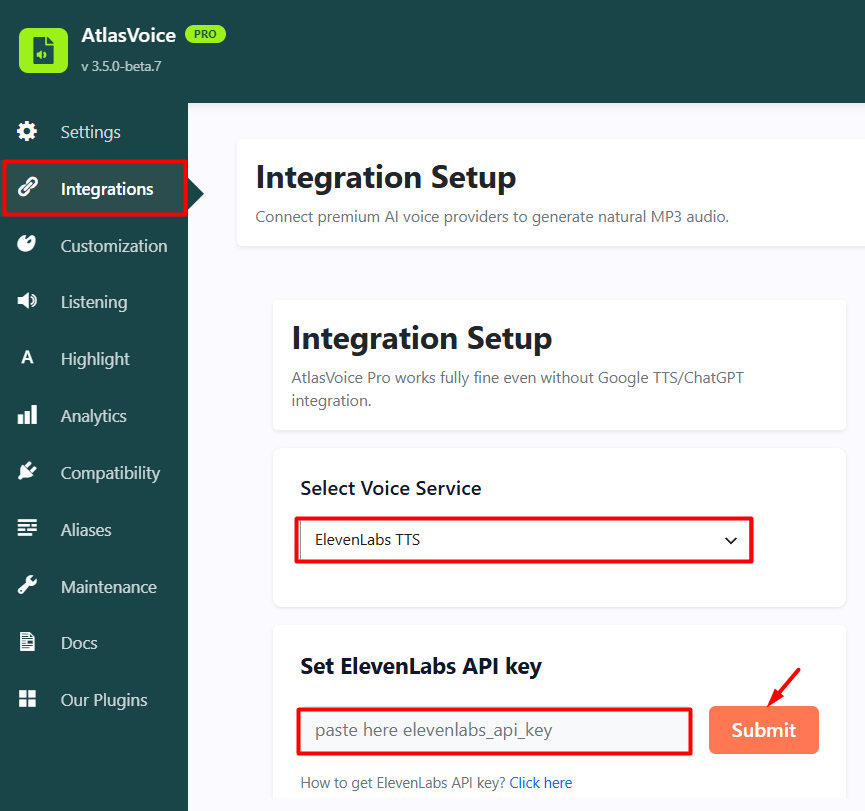
That’s it. Open a Japanese post and press play to hear your new voice.
How to Fix Kanji Misreading (The Part Most Guides Skip)
So your audio sounds great, except for that one word. Maybe it’s a city name, a person’s name, or a kanji the voice keeps reading the wrong way. Sound familiar?
Most guides stop at “test your audio.” But what do you actually do when a word keeps coming out wrong? Here are a few simple fixes, starting with the easiest.
Try a Different Voice First
Before changing your content, switch the voice. Different voices use different engines, and some handle kanji much better than others. A word one voice stumbles on might come out perfectly with another.
This takes less than a minute in the Listening tab, so it’s always worth trying first. If you’re using a free browser voice, moving to an AI voice often fixes most problems on its own.
Write Tricky Words in Hiragana
This is the most reliable fix, and it works with almost any voice. If a kanji word keeps getting misread, write it in hiragana instead.
For example, if a rare place name or personal name keeps coming out wrong, spelling it in hiragana removes all guesswork. The voice no longer has to choose between readings because there’s only one possible way to say it.
The downside is that heavy hiragana can make text look childish or harder to scan for native readers. So use this only for the few words that really need it, not across your whole post.
Add Readings in Parentheses
Want to keep the kanji and still guide the voice? Add the reading right after it, like 御徒町(おかちまち).
Japanese readers are used to seeing this style in books and news articles, so it doesn’t feel out of place. It also helps learners and anyone unfamiliar with the word. The only catch is that the voice will read both the kanji and the reading, so listen once to make sure it doesn’t sound repetitive.
Be Careful with Ruby (Furigana) Tags
Some Japanese sites use HTML ruby tags to show small furigana above kanji. They look great on screen, but TTS tools don’t always handle them well.
Depending on the plugin and browser, the voice may read the kanji and then the furigana, so the word is spoken twice. It may also skip the furigana completely. If your site uses ruby tags, test a few posts carefully and check whether your plugin lets you exclude certain tags from reading.
Use a Pronunciation Setting or SSML (If Available)
Some TTS plugins and providers let you control how specific words are spoken. Look for options named pronunciation, alias, or custom dictionary in your plugin settings. You add a word once, set how it should sound, and the fix applies across your whole site.
More advanced services like Google Cloud and Amazon Polly also support SSML, a markup language that tells the voice exactly how to say a word. It’s powerful but a bit technical, so it’s best for developers or sites with lots of specialized terms.
Break Up Long Sentences
Sometimes the problem isn’t one word but the whole sentence. Long Japanese sentences with few pauses can confuse a voice and flatten its rhythm.
Adding a 、in the right place or splitting one long sentence into two often makes the audio sound much more natural. As a bonus, it usually makes your writing easier to read too.
Common Problems and Quick Fixes
Even with the right setup, things don’t always go perfectly the first time. Maybe the play button won’t show up, or the voice suddenly switches to English. Don’t worry, most issues have a simple fix.
Here are the most common problems and how to solve them:
- The play button doesn’t appear: This is usually a caching issue. Clear your site cache and browser cache, then reload the post. If it still doesn’t show, check that automatic placement is turned on for that post type in the Settings tab.
- An English voice reads your Japanese text: The player is likely set to the wrong language. Go to the Listening tab and make sure Japanese (Japan) is selected. Also check that your Site Language is set to 日本語 under Settings > General.
- There’s no sound at all: If you’re using the free browser voices, the visitor’s device may not have a Japanese voice installed. Switching to an AI voice in AtlasVoice Pro fixes this, since the audio no longer depends on the device.
- The voice sounds different on each device: This is normal with free browser voices, because every browser and phone has its own set. For the same voice everywhere, use an AI voice instead.
- The voice reads things it shouldn’t: Code snippets, image captions, or ad text can end up in the audio. Check your plugin settings for options to exclude certain tags or sections from reading.
- The audio stops partway through long posts: Some browser voices cut off on very long text. Try an AI voice with MP3 generation, which handles long articles more reliably.
FAQs and Answers
Still have a few questions? Here are quick answers to the things people ask most.
Can I add Japanese text-to-speech to WordPress for free?
Yes. The free version of AtlasVoice uses your visitor’s built-in browser voices. Just keep in mind that quality changes from device to device.
Why does my TTS voice read kanji wrong?
Many kanji have more than one reading, and weaker voices sometimes guess wrong. Try an AI voice, or write stubborn words in hiragana.
Can one site read both English and Japanese correctly?
Yes. Use the shortcode or Gutenberg block to control audio per post, and set your Japanese posts to a Japanese voice.
Will text-to-speech slow down my WordPress site?
Barely. With a lightweight player and a good caching plugin, most visitors won’t notice a difference.
Can visitors download the Japanese audio?
Yes, with AtlasVoice Pro. It creates MP3 files so readers can listen offline, like a short podcast.
Conclusion
Adding Japanese text-to-speech to WordPress isn’t hard. The real challenge is making it sound natural to people who know the language best.
The free version of AtlasVoice is a great way to start and see how your readers respond. If you want clear, consistent Japanese audio on every device, AtlasVoice Pro with an AI voice is the better choice.
Whichever path you take, don’t skip the testing. Play a few posts, listen for tricky kanji, names, and dates, and fix the stubborn words with hiragana or a reading in parentheses. A few small tweaks can make your audio sound far more polished.
So why not give it a try today? Set it up, press play, and hear your content come to life in Japanese. Your readers on the train, in the kitchen, or learning their first kanji will thank you for it.
🔊 Stay Updated with AtlasVoice
Get the latest tips on text-to-speech, accessibility, and WordPress delivered to your inbox.
No spam. Unsubscribe anytime.