
How to Connect Claude, ChatGPT and Cursor to WordPress with OAuth 2.1 (MCP)
This guide shows you how to connect Claude to WordPress using the built-in OAuth 2.1 system — the same steps also work for ChatGPT, Cursor and Claude Desktop. AtlasAI Connector turns your site into a secure Model Context Protocol (MCP) server; below you’ll set up authentication, authorize a client, compare free vs Pro, find your tools, and customize everything.
Table of Contents
- 1. Before you start (requirements)
- 2. Your MCP server endpoint
- 3. Authentication methods at a glance
- 4. Enabling OAuth 2.1
- 5. How to connect Claude
- 6. The consent screen & scopes
- 7. JWT and Application Passwords
- 8. Free vs Pro
- 9. Where to find & choose your tools
- 10. Customization
- 11. Managing & revoking access
- 12. Troubleshooting
- 13. Security best practices
1. Before you start (requirements)
- The free AtlasAI Connector plugin installed and active (WordPress 6.8+, PHP 7.4+).
- Your site served over HTTPS. Remote clients such as Claude.ai will only connect to a secure (https) URL.
- A WordPress user account with permission to use the abilities you want the AI to access (each connection is limited to what that user is allowed to do).
- Optional: AtlasAI Connector Pro for per-role authorization policies, per-token scope enforcement and Tool/Resource/Prompt access modes.
2. Your MCP server endpoint
Once the plugin is active, your MCP server is live at:
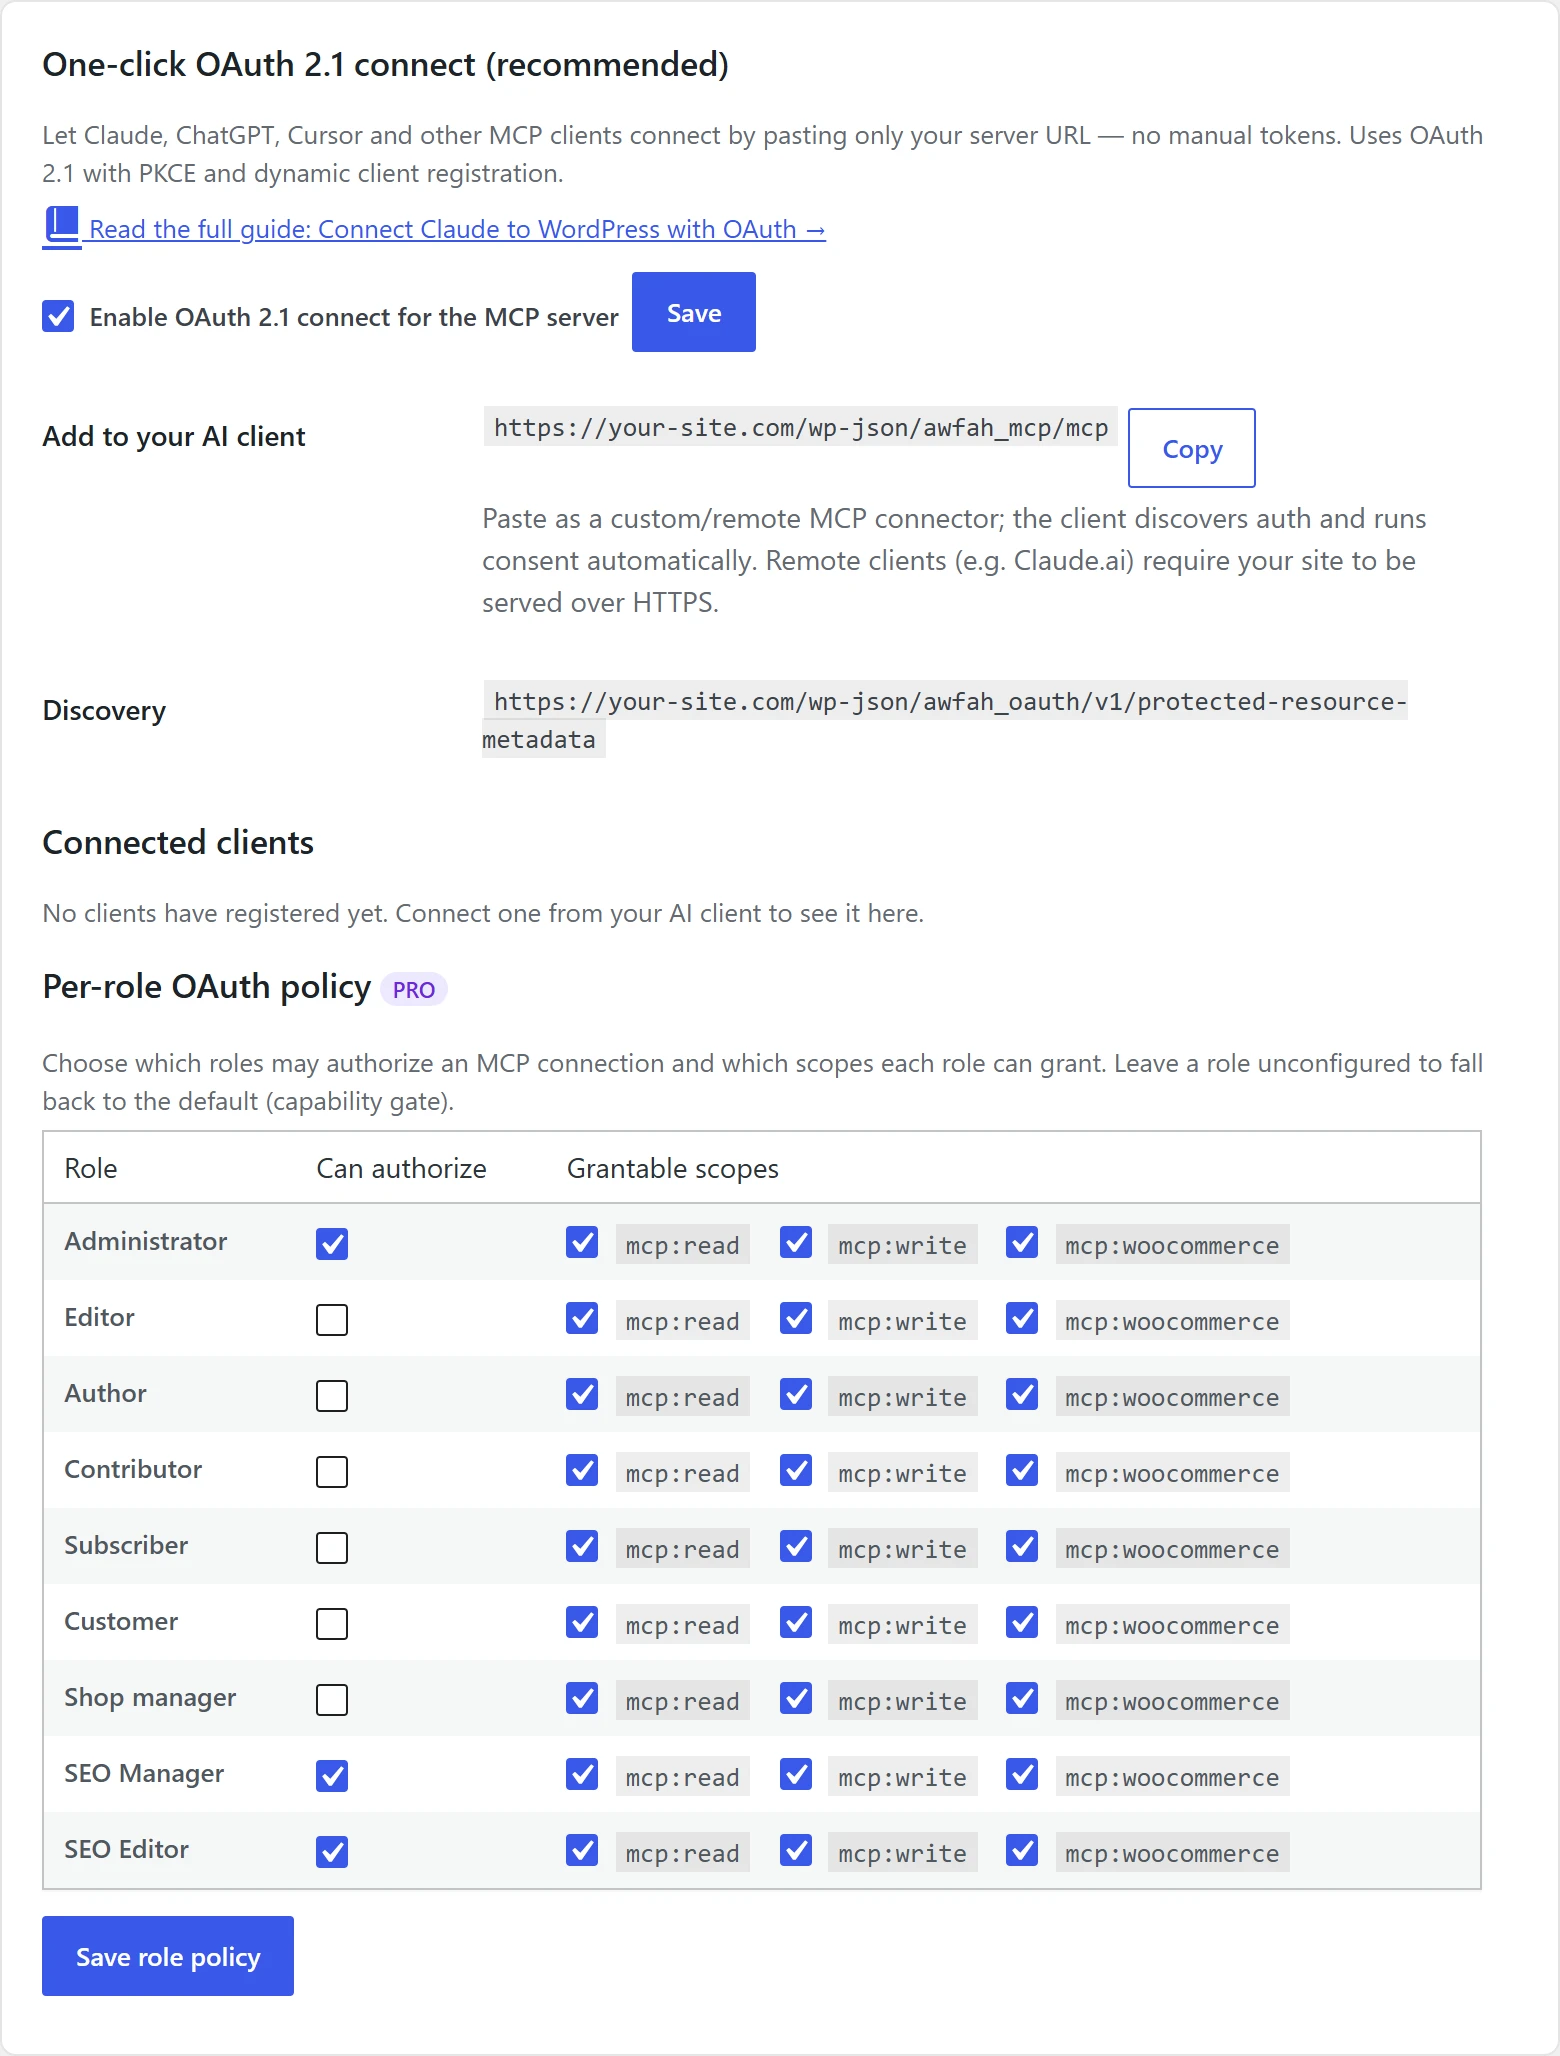
https://your-site.com/wp-json/awfah_mcp/mcpThis single URL is what you paste into any MCP client. The client automatically discovers how to authenticate using the standard OAuth 2.1 metadata documents your site publishes:
/.well-known/oauth-authorization-server— authorization server metadata (RFC 8414)/.well-known/oauth-protected-resource— protected resource metadata (RFC 9728)
Copy your exact endpoint AtlasAI Connector → MCP Auth page, in the Add to your AI client row.
3. Authentication methods at a glance
AtlasAI Connector supports several ways to authenticate, so you can pick what fits your client:
- OAuth 2.1 (recommended) — one-click connect for Claude, ChatGPT and Cursor. The client registers itself, you log in and approve, and a secure token is issued automatically. Mandatory PKCE (S256), short-lived access tokens and refresh tokens.
- JWT tokens — token-based access for programmatic/custom integrations, sent as an
Authorization: Bearerheader. - Application Passwords — WordPress’ built-in per-application credentials work out of the box.
4. Enabling OAuth 2.1
- In the WordPress admin, go to AtlasAI Connector → MCP Auth.
- Tick Enable OAuth 2.1 connect for the MCP server and click Save. Your site immediately begins publishing the OAuth discovery documents and accepting client registrations.
- That’s it — there are no client IDs or secrets to copy by hand. Connected clients will appear in the Connected clients table on the same page.
5. How to connect Claude
Claude.ai & Claude Desktop
- Make sure OAuth 2.1 is enabled (step 4) and your site is on HTTPS.
- Copy your MCP endpoint URL from the MCP Auth page:
https://your-site.com/wp-json/awfah_mcp/mcp - In Claude, open Settings → Connectors and choose Add custom connector.
- Paste the endpoint URL and confirm. Claude discovers the authentication automatically.
- Claude opens your site’s authorization page. Log in to WordPress if asked, review the requested permissions and click Authorize.
- You’re connected. Your enabled abilities now appear inside Claude as tools you can call by chatting.
Claude Code (CLI)
claude mcp add --transport http atlas https://your-site.com/wp-json/awfah_mcp/mcpThen run /mcp inside Claude Code and choose to authenticate — your browser opens the same consent screen. Once approved, the tools are available in your session.
Other clients (ChatGPT, Cursor, Windsurf)
Add the same endpoint URL as a custom / remote MCP server in the client’s connector settings. The OAuth flow is identical: paste the URL, log in, approve.
6. The consent screen & scopes
When a client connects, your site shows an “Authorize MCP Connection” consent screen that clearly lists what the client is asking for. Permissions are grouped into three scopes:
mcp:read— read site content, settings and data.mcp:write— create and update posts, pages, media and users.mcp:woocommerce— manage your WooCommerce store.
Access tokens are short-lived (about one hour) and are refreshed silently; refresh tokens last around 30 days. A connection can never do more than the WordPress user who approved it is allowed to do.
7. JWT and Application Passwords
If you are building a custom integration instead of using a chat client, you have alternatives to the interactive OAuth flow:
- JWT: generate a token on the MCP Auth page under Authentication Tokens and choose how long it lasts, or request one with
POST /wp-json/jwt-auth/v1/token. Send it asAuthorization: Bearer <token>. Tokens expire automatically and can be revoked. - Application Passwords: create one under Users → Profile → Application Passwords in WordPress and use it with HTTP Basic auth — no extra configuration needed.
8. Free vs Pro
The entire OAuth 2.1 server — discovery, dynamic client registration, PKCE, the consent screen and the token endpoint — is included in the free plugin. Pro adds finer-grained control over who may authorize and what each token is allowed to do.
| Capability | Free | Pro |
|---|---|---|
| OAuth 2.1 one-click connect (Claude, ChatGPT, Cursor) | Yes | Yes |
| Dynamic client registration & PKCE (S256) | Yes | Yes |
| Consent screen, scopes, token refresh & revoke | Yes | Yes |
| JWT & Application Password auth | Yes | Yes |
| Role-based access by module (which tool groups a role sees) | Yes | Yes |
| Per-ability access (single tools per role) | — | Yes |
| Per-role OAuth policy (who may authorize, which scopes) | — | Yes |
| Per-token scope enforcement (stricter than the role) | — | Yes |
| Tool / Resource / Prompt (T/R/P) access modes per role | — | Yes |
Get the plugin: Download the free AtlasAI Connector from WordPress.org, or upgrade to AtlasAI Connector Pro to unlock per-role OAuth policy, per-token scope enforcement and Tool/Resource/Prompt access modes.
9. Where to find & choose your tools
“Tools” are the abilities your site exposes to the AI. Two places control them:
- AtlasAI Connector → Modules — turn whole groups of tools on or off.
- AtlasAI Connector → Access control — choose which tools each WordPress role may use.
For every module and how many tools it adds, see how to choose which WordPress tools your AI client can use.
Abilities are exposed to AI in three forms: Tools (actions the AI can run), Resources (data it can read) and Prompts (guided workflows).
10. Customization
- Role-based access (free): choose which tool groups each WordPress role may use under Access control, so different users grant different tools. Pro lets you grant single abilities.
- Per-role OAuth policy (Pro): decide which roles may authorize an MCP client at all, and cap the scopes they can grant.
- Per-token scope enforcement (Pro): restrict an individual connection below what its user could otherwise do.
- T/R/P access modes (Pro): expose an ability as a Tool, a Resource, a Prompt, or any combination, per role.
11. Managing & revoking access
- Every connected client is listed on the MCP Auth page with its granted scopes and connection date.
- Click Revoke next to a client to instantly delete it and all of its tokens — the AI assistant loses access immediately.
- JWT tokens can be listed and revoked through their own endpoints if you issued any.
12. Troubleshooting
- Client won’t connect / no login prompt: confirm OAuth 2.1 is enabled and your site is on HTTPS. Remote clients reject http URLs.
- “Connection failed”: open
https://your-site.com/wp-json/awfah_oauth/v1/protected-resource-metadatain a browser — it should return JSON. Also re-save permalinks (Settings → Permalinks) so the rewrite rules register. If another plugin with its own MCP server is installed, such as Rank Math or Imagify, update AtlasAI Connector to 1.8.0 or later. - The AI can’t see a tool: make sure its module is on under Modules and the connecting user’s role may use it under Access control.
- WooCommerce tools missing: the Store Manager module only loads when WooCommerce is active.
13. Security best practices
- Always serve your site over HTTPS — it is required for remote clients and protects tokens in transit.
- Connect using a WordPress user whose role only has the abilities you actually want the AI to use; avoid authorizing as a full administrator unless necessary.
- Expose only the abilities you need, and review the Connected clients list periodically — revoke anything you don’t recognize.
- On Pro, use per-role OAuth policy and scope enforcement to keep each connection least-privileged.
Related guides
- Set up AtlasAI Connector
- Limit what Claude or ChatGPT can do by user role
- Choose which tools your AI client can use
- WordPress MCP server not connecting? Fixes
Need a hand? Reach the team at atlasaidev.com.